Friday, June 29, 2012

子ども用かわいい腹巻の作り方 お顔のついたHaramaki


かわいい腹巻

子ども用かわいい腹巻きの作り方


妹からのリクエストで姪にスムースニットで腹巻を作りました。作っているうちに、顔をつけたらどうかな〜と、私の遊び心です。腹踊り?もできます。ははは。

作り方

  1. ニット生地を広げて少し伸ばしながら子どものお腹に巻いて一番細い部分、たぶん胃の周り、に印をつける。長さもどこまでカバーしたいかで印をつける。印はまち針でok。
  2. 幅は印どおり、縫い代なし(伸びるので)、長さは倍(二重にするので)に布を切る。
  3. 中表に縦に半分に折って端を1センチくらいの縫い代で筒に縫う。
  4. 今度は筒になった生地を中表に縦に半分に折る。5センチくらい返し口を残して端を1センチくらいの縫い代で縫う。
  5. 返し口から表に返して、返し口を綴じる。
  6. 顔を消えるチャコペンで直接書く。
  7. 顔に刺繍する。と言っても唯一私ができるチェーンステッチで、糸も太い刺し子用糸で大きな針目でしました。二重になっているので、ステッチは裏布にも通します。これで表と裏がずれないという思わぬ効果も。
ヒント:

ニットは伸び方がいろいろですが、基本的に実寸の80-85%で大丈夫だと思います。寝る時につける腹巻なので、これはゆるめです。

用尺は、出来上がりの丈の長さの倍あれば大丈夫です。

かわいい腹巻へのアクセスが多いので、お顔を線画にしました。よろしければプリントアウトしてサイズを調整して使ってください。


Girl's Travel Neck Pillow: かわいい子ども用ネックピロー 手作り

海外の型紙で作った、飛行機や車の中で使う旅行に便利な子ども用ネックピローです。 首につけるとうさぎの耳が垂れ下がってむちゃくちゃかわいい。姪は引っ張ったり枕に使ってしまったりで、形がかなり歪んでしまったけど、もともとは下の写真のような、こんな感じです。

I made this travel neck pillow for my niece several years ago. When she wears, the ears of bunny hang down and it's so cute! She used it for her daily pillow and also pulled and played so the bunny doesn't look exactly same as the one when I made. It was like this.

かわいい理由はうさぎの耳に動きがあることと、耳の裏側が別布だということだと思います。うさぎも一緒に眠っています。顔と手(前足)・後足はつながっている一枚の型紙で、中綿を入れた後に上からステッチをかけることで手足があるように見えるようになっていて、パーツが少なく初心者でも簡単につくれるようにと、本当によくできている型紙だと感心。アイデアのご参考に。使った海外の型紙はこちらからどうぞ

I think the reason of bunny's charm is that the ears hang down and swing, and another bright color fabric is used for the inside of ears. The face and front legs are separated only by stitching which enables sewing beginners to sew easier rather than struggling with many parts. I used Buttrick Sew Baby F853.

この作品を作りたいけど自宅にミシンがない、作り方がわからない方へ

自宅でミシンカフェならぬ、ソーイング・カフェを開いています。お教えしますので、お友達と一緒に作りませんか?

お問い合わせはプロファイル頁にあるアドレスにメールでお願いします。日程や時間帯はご相談に応じます。働いている方も是非手作りを楽しんで欲しいです。ミシンとロックミシンは揃っています。手作りを一緒に楽しみましょう。

お問い合わせはこちらのプロファイル頁の左側、メール欄からどうぞ


Thursday, June 28, 2012

Obi Display by My Sister After Our Obi Shopping

After a day shopping of Obi, she went back to home overseas and sent me photos. Our shopping guide page how to budget and choose is here. She placed one of Obi in the center of the table.

obi display
The obi was narrower than usual so a black long fabric was placed underneath.

Gold, red, and black match each other. I think it is elegant.

The other Obi we bought. Already the very left one was given as a birthday gift to her friend, a Scottish interior decorator.

Some of them may need ironing.....


Kimono and Obi shopping in Tokyo is here.


Wednesday, June 27, 2012

Fabric Shopping in Nippori Fabric Town, Tokyo: An advice based upon my own experience


Nippori is famous for the good price and variety of fabrics with so many, more than 60, shops. However, only if you meet the following conditions, you should go to Nippori. Otherwise you may end up a day terribly exhausted with a poor bag. You'll find better hunting in ordinary fabric shops in other places in Tokyo.

If you want:

  1. To look for getting INSPIRED by unusual fabrics;
  2. To look for fabrics for your particular projects which require relatively large amount of fabrics;
  3. To eager to spend a day anyway.
Why unusual fabrics are there:

Nippori was Whole-sellers Town historically although they have been shifting to target individual consumers. It seems they still have strong connections to both fabric makers and garment manufacturers. I believe that is the reason that they have unusual fabrics of a) overstock from fabric makers, and b) leftover fabrics from garment manufactures or interior makers. This also makes the price lower.


Suggestion to condition #1 Inspiration Seeker

  • First, you must go to Tomato Arch (Map#48) next to Tomato Main (Map#49). Go into the right door and don't look the left side. Around the entrance of the bldg., along the right wall there are a lot of 100 yen/meter fabrics. They are mostly unkown materials so judge on your own. Go deeper and down the steps and you'll find unusual materials on bargain. Sometimes it's thick Chinese silk brocade used for chairs or couches at 300 yen/m, synthetic coarsely woven fabrics in bright colors (what is it for? I don't know but I got it to make a beach mat), or a cotton printed of a sumo wresler's name in Kanji.. Don't ask me what it is for! I bought a synthetic python leather at 350 yen/m Tomato Arch months ago to make a bag and I found the same one was sold at 2300 yen/m at Tomato Main a week ago. It is a treasure hunting and each time things are different due to their incoming fabrics from their networks and probably the timing of inventory control.
  • Then you can go to any other shops. If you look for something Japanese, go to the 4th floor of the next bldg., Tomato Main.
  • Other unusual fabrics may be found at Zak Zak Main(Map #64).
 

Suggestion to condition #2 Particular Project Holder

The following shops are my favorite ones for their good quality.

  • High-end and designer brand fabrics for dress: Elegance (Map#31) Many designer brands - Valentino, Pucci, etc. ; Alon(Map#68)
  • Wool: ARAI FABRICS (Map#23)
  • Knit and stretch fabrics: Momo (Map#59), NAGATO 2ND (Map #32)
  • Lace, velvet, embroidered fabrics: MIKI (Map#56)
  • Linen: Yasuda Shoten (Map#69)
 

Suggestion to #3

Enjoy each shop as you go around!


Notes:

Tea time:

If you like Japanese sweets and tea, go to Habutae Dango, established in 1819(!), which is shown in the official map, near Nippori Station. I recommend the main store among two where you can enjoy Habutae (meaning smooth silk - implying it's smooth texture) Dango in a well coordinated atmosphere. Read this English page for more information.


Pleas refere to my other page, Kimono and Obi shopping in Tokyo for those who don't know how to budget and how to choose.

Good luck!


Tuesday, June 26, 2012

Girl's Name Tag Tutorial: 女の子用かわいいお名前タグ作り方

かわいい名前タグ作り方
直接バッグなどに貼り付けたり縫い付けたりするタグだと、小さい子は知らない人に名前を呼ばれて、ついて行ってしまうんじゃないかと心配。このタグも絵柄の方が表になるように付けます。姪の幼稚園の持ち物用にタグをたくさん作って、と言われて作ったものです。いちいち名前を書くよりタグをつけた方が早いし楽だから、ということで簡単に作る方法を考えたもの。小学校入学時には更に妹から注文が!そりゃあ、あなたは楽でしょうよ!作るのは私なんだから。

Tutorial in English can be seen at the bottom of this post.


材料

  • かわいいプリントの生地。私は運良く写真のような、模様がランダムに入った生地を入手。
  • 厚めのフェルト。100円ショップにあります。
  • 接着芯。100円ショップにあります。
  • 合成レザーの紐。
  • 30番のミシン糸。フェルトより濃い色。
  • 11番のミシン針
  1. プリント生地に接着芯をアイロンで貼る。
  2. 生地の模様にあわせて四角や長四角などにハサミで切り出す。端は切りっぱなしでok。
  3. タグの裏に名前を書くために、プリント生地の模様のない無地部分も切り出す。
  4. 切った生地に合わせた形に、つまり生地より少し大きい四角、長四角などにフェルトを切る。2枚ひと組。
  5. フェルトに切り出したかわいいプリント柄を乗せてみて、よければスティック糊で真ん中を仮止め。
  6. 裏用フェルトも同様に小さなプリント部分と、無地のお名前用生地をつける。
  7. フェルト2枚の間に合皮の紐を挟んで、ミシンで表から大きめのジグザク縫い。うらの無地部分の真ん中にジグザクが入ったって大丈夫。30番糸なので、手作りっぽく温かみのある模様縫いのようになります。
厚手のフェルト2枚プラス芯を貼った生地の効果で、しっかりしたお名前タグの出来上がり!

おんなじ柄だと作っている私が飽きちゃうので、いろんな柄の入ったプリントにしました。ちょこちょこと捨てられない布があれば作れます。


What you need:

  • Cotton print fabric. I chose the one that the cute patterns were randomly printed.
  • Thick felt fabric. I bought at a 100 yen shop, a sort of dollar shop, in Tokyo.
  • Fusible interfacing
  • Synthetic leather strings
  • Thread, heavy duty, darker color than the felt. I used dark red for pink and orange felt.
  • Matched sewing machine needle for the heavy duty thread
  • How to make Girl's Tags:

    1. Put the fusible interfacing on the fabric by ironing.
    2. Cut the patterns out of the fabric such as square and rectangular.
    3. For writing the name, cut out non-patterned parts as well.
    4. Cut the felt a bit larger than the patterns already cut out. Cut two per a tag.
    5. Lay the pattern on the felt and if it looked nice, glue the center back to hold temporarily.
    6. Lay the non-patterned fabric and some small patterns on another felt and glue as well.
    7. Set the leather string between two felts and stitch wide zigzag from the front. No need to worry if the stitch came along the middle of back side. As the heavy duty thread is used, it looks like a handmade, warm finish.
    Note: They will be hard enough for Girl's Tags resulting of thick felts and interfacing.


    Enjoy DIY!


    You might also like my other posts:


    この作品を作りたいけど自宅にミシンがない、作り方がわからない方へ


    自宅でミシンカフェならぬ、ソーイング・カフェを開いています。お教えしますので、お友達と一緒に作りませんか?

    お問い合わせはプロファイル頁にあるアドレスにメールでお願いします。日程や時間帯はご相談に応じます。働いている方も是非手作りを楽しんで欲しいです。ミシンとロックミシンは揃っています。手作りを一緒に楽しみましょう。

    お問い合わせはこちらのプロファイル頁の左側、メール欄からどうぞ


    Monday, June 25, 2012

    About me

    Thank you for visiting my new blog from all over the world, USA, UAE, France, Germany, Switzerland, Spain, South Korea, Indonesia, Philippines, Hong Kong, Malaysia, Myanmar (Burma), Australia, Russia and of course my country, Japan!


    I have started my blog on June 2nd, just three weeks ago. I never thought my blog was accessed by so many poeple. Thank you!


    To tell you the truth, I even couldn't fix a button and always payed a dry cleaner to sew... until 2 years ago.


    It seems as if suddenly my mother's DNA awoke inside of me. She must be laughing in the heaven.


    I was born and raised in Tokyo. I was only interested in working hard in the business world. I changed my life and now I am enjoying creating things. I hope other people will find the truth that sewing and handmaking make the life brighter and worthy.


    I am learning tools to make this blog day by day. Since I am using iPad, I could not upload my photo into About Me. Above photo is me, Maina.... Sorry it's just a silhouette, I'm a bit shy.


    Love,


    Maina


    Saturday, June 23, 2012

    動物コスチュームのしっぽをピンとさせる方法100円: How To Retain Animal Tail Shape w/o Wire, Tutorial


    子どもの動物コスチュームの長いしっぽ。おさるのジョージ、ひとまねこざるを姪に作ったあと、しっぽをつけて~と言われてしまい、ジョージはしっぽはないよ、と何度言ってもダメで、どうしたら針金を入れないでつくれるか、考えた末にたどりついたもの。ハロウィーン、お遊戯会のご参考に。


    My niece insisted me to put a long tail to Curious George even though I told her that he didn't have a tail after I checked the books... Well, I didn't want to use a wire wrapped by a cotton batting because I suspected that it would be cumbersome to pull that into the narrow tail and also worried about the wire would come out.


    針金だと、 筒状になった長いしっぽに綿を巻いて入れ込むのがえらく大変に違いない…。と、近所の100円ショップへ。おお、これだ!と閃いたのが、電気製品のコードをまとめるスパイラルコード。筒状のしっぽに入れるのも簡単。針金ほどピンとしないだろうけど、一旦上に立ち上がった形はキープしたままクネクネ動かせるので、姪はお気に入り。それに針金じゃないから危なくない。

    せっかく作るなら、頭を別に作って、コットンの起毛しているニットで作ればあとでパジャマにできます。後ろがダブダブだったので、平ゴムの両端に安全ピンをつけて、裏からウエストを留めてシャーリングさせるという苦肉の策。しっぽは後から手で縫い付けたので 取り外し簡単。スパイラルコードはこういう形状です。

    Then I went into a dollar shop nearby, looking for something else. Instead of a wire, I used a spiral tube and it was easier and kept the tail shape as shown on the photos. She could move the tail around. The spiral tube is this. It's mainly used for organizing multiple electric cords. I sewed it by hand so that after the halloween or school play or whatever, I could remove it easily and the costume can be used as pajama.

    昨日に続き、マーサ・スチュアートの無料アプリで写真遊んでしまった。

    Again, I played Martha's free iPad App for my photos today.


    To see the front picture of Curious George, click this. ひとまねこざるの表側はこちらからどうぞ


    Friday, June 22, 2012

    I used Martha Stewart's Free iPad App (free until July 8th!) マーサ・スチュアートのスクラップブッキングができる無料アプリ使ってみました。

    I was going to post my recent handmade linen scarf and then found out yesterday that they just released iPad App for free until July 8th. By this, I was so excited and downloaded the App. It was fun and easy to make cards and photo embellishments. Here is the page to get more info.

    To be honest, I do not like to make any solicits for the purpose of making money and my blog does not advertise any particular shop or company. I trust my judgmental ability and the only things I experienced or liked are shown in this blog. However, I have to admit that Martha Stewart gave me a lot of inspiration since middle of 1980s when she published cooking books. You might want to know this opportunity to get the free iPad App, I thought. All the photos and a card shown here have put some cosmetics by the App, results of my experiment.


    iPadで使う無料アプリをマーサ・スチュアートが昨日リリースしたのを知って、早速使ってみました。写真とカード全て拙いながら加工したものです。詳しくはこちらから。(英語)

    ブログ内に広告もなにも付けていません。自分が実際に作ったものや好きなものを書いて行くつもりです。でも無料なのは7月8日までなので、知りたい方がいらっしゃればと思い書きました。

    ところで、リネンスカーフを作りました。刺繍入りゲスト用リネンタオルがセールになっていて、夏に大好きなネイビーブルーの貝の柄だったので、2枚つなげて手縫いしました。

    Then here is the scarf I made. I bought two nice linen guest towels embroidered navy blue shell. They were on a great bargain! All I did was to put them together by hand sewing. I love navy blue in summer. Maybe you do, too.


    I also made the card using the App. Thank you for visiting my blog from all over the world!


    Thursday, June 21, 2012

    Handmade Project for Tsunami Survivors: ふんばろう東日本ハンドメイドプロジェクトHow to Make Noren

    To sewing lovers:

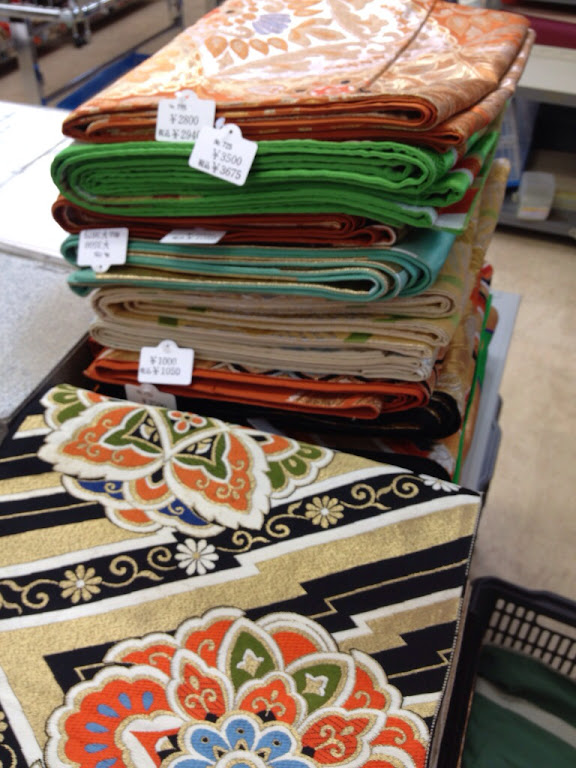
    If you love sewing and live in Japan, there are things you can support the devastating Tsunami survivors. I would like to introduce a handmade project run by Fumbaro Higashinihon (meaning Hang in There, Eastern Japan). One of their current requests is Noren, a Japanese style curtain, to keep their privacy of their temporary housing. Noren is like this.

    The Tsunami survivors live in the temporary housing, and for the air circulating in the rooms and for keeping the privacy, they are using Noren at the front door like this.

    Fumbaro Eastern Japan's main English home page is here. Please find out other opportunities you may want to do from this site. You can buy goods such as foods and diapers which will be directly sent to the local support organization you chose from Amazon Japan.


    The handmade project page has not been translated into English. I added English words as below.

    As above, materials are also needed for them to enjoy sewing and knitting. You may agree those craft making makes us so relaxed and is refreshing. This must be more true if you had experienced such a big disaster.

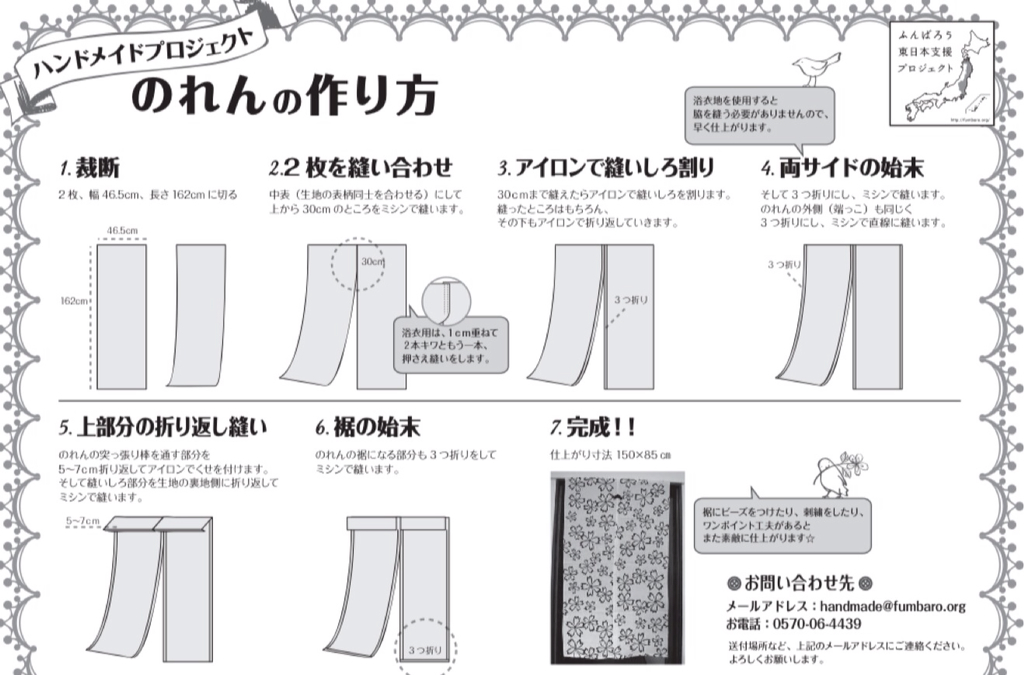
    Requested handmade goods are here. Since there is no English page, I translated as above. Tutorials are In green arrowed section. Though the tutorials are in Japanese, you can understand the step-by-step guidance of pictures and drawings. If not, contact me through the comment box. Please note that requested items change weekly or monthly based upon the most currently needed goods. I recommend you contact the project coordinator before you start sewing. I pick up Noren tutorial and explain how to make.

    1. Cut 2 fabrics of 46.5 x 162cm
    2. Put them right side together, sew 30cm from the top. If you use Japanese kimono or yukata fabric, you don't need to fix the seams. In this case put one fabric onto the other and top stitch twice as shown.
    3. Press the seam from the top to the bottom and fold twice and stitch.
    4. Sew the both sides as same as #3.
    5. Press 5 to 7cm from the top edge and fold the hem, say 1.5cm, and stitch. This is for a rod to come through.
    6. Stitch the bottom.
    7. Finished size is 85 x 150cm
    Note: The width of Noren is narrower if you use kimono or yukata fabric. According to the project coordinator, that is o.k.


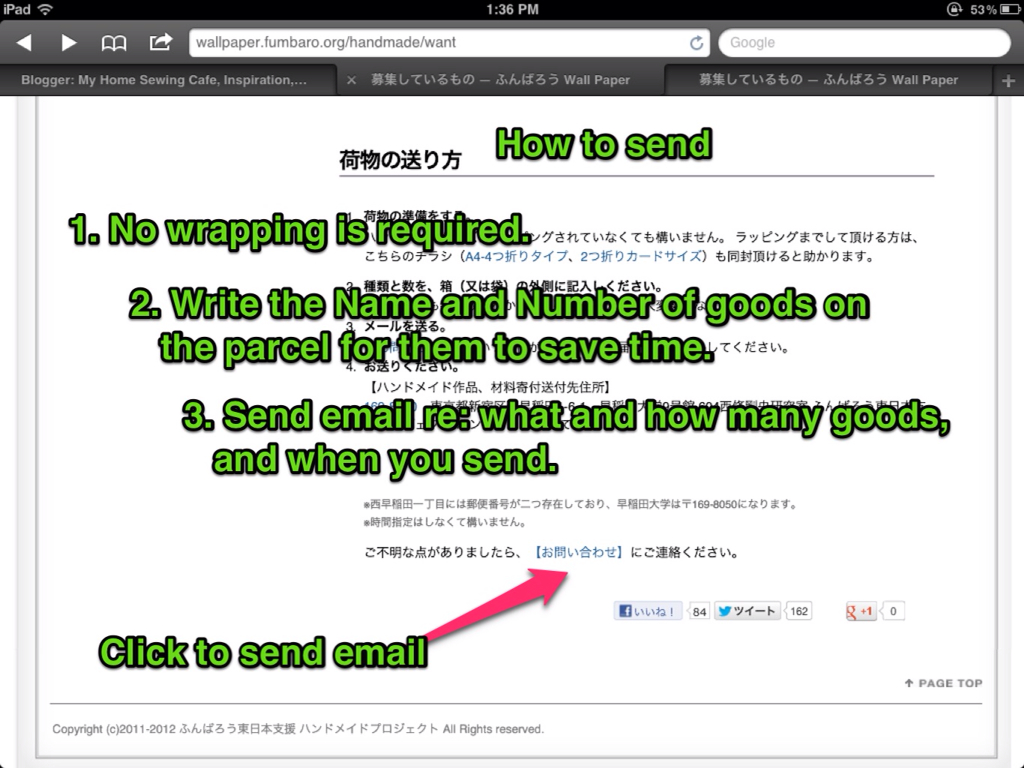
    Please make sure the full information - what item (arm covers, round pad, mask, or Noren, at the moment), how many of them, when you are going to send - should be given to the project coordinator by email. Here is the page to send email. Write your name in the top box, your email address in the second, and the content in the third box.

    The address to send parcels is:

    169-8050 東京都新宿区西早稲田1-6-1 早稲田大学9号館 604西條剛央研究室 ふんばろう東日本支援プロジェクト ハンドメイドPJ宛て
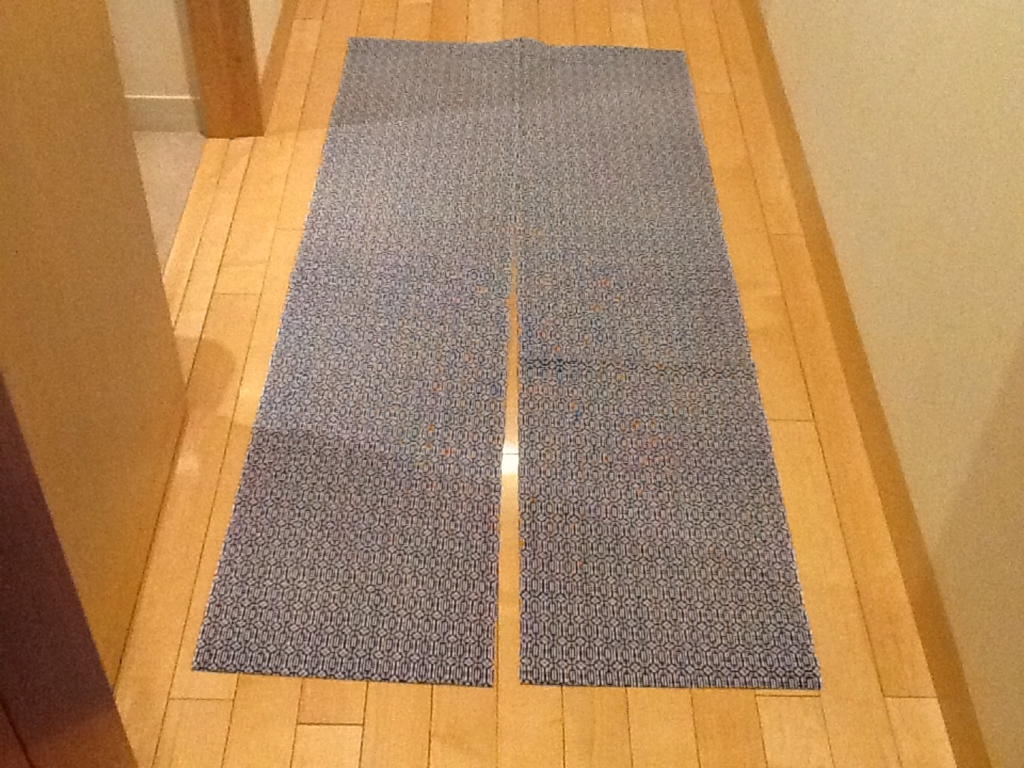

    Handmade PJ, Fumbaro Eastern Japan

    c/o Prof. Takeo Saijo

    Waseda University Bldg.#9 Room#604

    Nishi-Waseda 1-6-1

    Shinjuku, Tokyo 169-8050


    It took me only 30 min. to make these and it would be a great chance for you to learn how to make a Japanese style curtain, Noren.


    Wednesday, June 20, 2012

    雨の日に子どもとおうち遊び 5種類: 海外のアイデアからも~5 Rainy Day Kids Activities

    梅雨でも台風でもお家の中にあるもので。親の方が楽しいかも~。
    その1) タオルの動物 バスタオルと輪ゴムで簡単に作れる動物シリーズですBath Towel Animals
    アメリカではクルーズ船内でキッズアクティビティとしてクルーが教えるようです。大人の私がハマりました。猫、ボート、カエル、白鳥、ゾウ、お猿、ロブスターの7種類のタオル動物の絵入りの丁寧な作り方はこちらから無料ダウンロードできます。姪が来たときに一緒に楽しみました!本人もお猿のつもり?
    その2) クレヨンマーブル模様の石 Swirly Stone
    出来上がりはすごく綺麗で、ペーパーウェイトとしてプレゼントにもなるくらい。超オススメです。あっと言う間にできちゃうので、石を多めに用意した方がいいです。もっとやりたいと言って、石拾いに出かけたほどです。作り方はここから。英語が苦手の方のために作り方を書いておきます。
    1) 楕円形や丸の、表面がつるっとした石とクレヨンを用意。クレヨンは紙の皮をむいておく。チビたクレヨ ンも使いましょう。
    2) オーブンを110度に温め、アルミ箔を敷いた上に石を並べて15分から20分温める。
    3) 石をオーブンミトンで取り出して、古新聞を十分に重ねた上に乗せる。

    4) 子どもに軍手をはめさせ、好きな色のクレヨンをグルグルして、石の上に模様を描く。2本くらいクレヨンをまとめて握ってするといいです。

    5) あっという間にクレヨンが溶けて模様ができます。110度という低温で温めているので、すぐに冷めてきます。完全に冷めるまでそのままにしてください。ツヤとクレヨンマーブル模様の保持のため、気に入った作品は、外やベランダでクリアラッカーをスプレーするといいです。姪は、パパのオフィス用ペーパーウェイトにと、大き目の楕円形の石で作ったものを持って帰りました。

    How to make Swirly Stone Is from this FamilyFun's page.


    その3) バナナに刺青 バナナ・タトゥー

    バナナ・タトゥーは芸術的なタトゥーを入れるYouTube のアーティストから

    とてもあのような作品は無理だけど、テンプレートがあれば、上から絵をなぞってピンで刺すだけです。私はボロボロになったバンダナをバナナに巻いて上からピンで模様を刺しました。雑誌のかわいい絵や子どもの名前をタトゥーしてもいいと思います。お弁当にも。


    I wrapped the banana with an old bandana and used a push pin to draw. Any templates from magazines can be used.


    その4) 紙のお魚釣り Paper Fishing

    これは私が子どものころ、6歳下の妹に作ってあげて妹がすごく喜んだ遊びです。妹はその頃3ー4歳でした。何度も何度も魚を撒くのをやらされました。今どきこんなアナログの遊びはしないかもしれませんが、ゲームソフトで姪に遊んで欲しくないので…。

    • 画用紙にお魚、タコ、イカなどの絵を描いて切り、ゼムクリップで口のところを挟む。
    • 割ってない割り箸に紐を挟んで紐を垂らして磁石をつける。磁石は冷蔵庫に貼るマグネットで大丈夫。紐は長い方が釣ってる気分になります。
    • ダイニング用の椅子で囲んだ床にお魚を置いて、後ろ向きの椅子に正座して釣りました。


    When I was a child, I made paper fish for my little sister. I draw lots of fish and cut them and put clips so that the fish can be catched by a magnet fishing rod, which is made out of chopsticks and a string. My sister demanded me to play again and again... This play may seem to be old but I believe kids do not need TV games all the time.


    その5) 顔のパン Face on Bread

    トースト用のパンに、ロースハムと溶けるチーズ(スライス)、ケチャップで顔を描きます。スライスチーズは手でちぎって。チーズのコクがあるので、バターは塗りません。オーブントースターで焼いて出来上がりです。子どものクリエイティビティーにはいつも驚かされます。


    A slice of bread, ham, cheese, and ketchup. My niece enjoyed making funny face toasts for her breakfast. Tasted good!


    作品を作りたいけど自宅にミシンがない、作り方がわからない方へ

    自宅でミシンカフェならぬ、ソーイング・カフェを開いています。お教えしますので、お友達と一緒に作りませんか?

    お問い合わせはプロファイル頁にあるアドレスにメールでお願いします。日程や時間帯はご相談に応じます。働いている方も是非手作りを楽しんで欲しいです。ミシンとロックミシンは揃っています。手作りを一緒に楽しみましょう。

    お問い合わせはこちらのプロファイル頁の左側、メール欄からどうぞ


    You might also like my other posts:


    Sunday, June 17, 2012

    Kimono and Obi Shopping in Tokyo: From Japan with Love

    Vintage Kimono and Obi (belt) are the best things to buy in Japan. Kimono Underwear which is same shape with Kimono without lining is a lot cheaper and good for a robe. Obi can be displayed on your wall or table. You might not know the price range and how to choose so I will share some ideas for your shopping.

    1. Recently I went to Obi hunting with my sister. She came back from abroad and wanted to buy Obi to take back. There are many used Kimono shops in Tokyo. The price range varies but it starts as low as 1000 yen, or $12. If you cannot find that price in the shop, the target clients must be people actually wear Kimono so that the products are in super good condition to wear.
    2. Obi less than 1000 yen is a junk usually but if you want to cut it in pieces for recycling or upcycling, go for it. The length of Obi is 13 feet, and is silk! You can make something like bags or placement mats using a part. There are some Obi not made out of 100% silk so ask about the material to the shop owner.
    3. The shop we went is located in Nippori which is Tokyo's fabric town. In front of the famous Tomato , the largest fabric shop in the town, there are 2-3 used Kimono shops. I may write about Nippori in this blog in future. (I wrote! Please see the link at the bottom.)
    4. Some may have creases because the interfacing got shrunk in the long time. You can iron it over a cloth with low temperature with no steam but I can't fully guarantee the result as the inside of Obi, interfacing, may not stretch anymore.
    5. I recommend buy Fukuro Obi, not Nagoya Obi. Nagoya Obi is not flat shaped, sewn in the middle in order to wear it easier so it cannot be flatten on your wall or table.
    6. We budgeted 1000 yen to 3500 yen, $12 - $40, approximately. Oh, I just found a good English tutorial page of how to display Obi. Here is the page. One of their pictures is this. Beautiful!
    Our result of Obi hunting is here.

    My favorite is the middle one, midnight blue base with silver and gold flowers. I am always amazed by the free spirits and a great sense of design of our ancestors.

    This Obi was 1000 yen or $12. Gold cranes facing each other, probably worn by a wedding guest as cranes are thought to live 1000 years thus good fortune is indicated. It would be gorgeous to hang on a wall.

    If you have any questions, please ask me through the comment box.

    You might also like my other posts:


    How to Organize Threads and Bobbins on Budget ミシン糸とボビンのこんがらがらない整理収納方法 100円

    I had been overwhelmed by increasing stock of threads and bobbins and annoyed by the fact that the bobbin threads coming out all the times getting entangled with others! To make matters worse, it was time consuming to find matched thread and bobbin!!! Well, the best solution is to keep the thread and matched bobbin together. Then how?

    増え続けるミシン糸とボビンどうしていますか? ボビンの糸が絡まらず、ミシン糸とマッチしたボビンを探すのが簡単な方法はこれです。市販のケースは忘れましょう。買ったけど、ボビンしか入れられず使いにくかった。ミシン糸にボビンをくっつけるボビンキャッチャーも売ってるけど、ボビンの糸はほどけるし、糸が増えてくると買い足すのもコスト高。100円ショップで十分です~。

    You need:

    • Elastic hair scrunchy (band) covered by pile. I bought 15 of them in a package at 100 yen (a dollar shop).
    • Pipe cleaners
     

    • リングヘアバンド(100円ショップで15個入り100円でした)
    • モール
    Wrap the bobbin by the hair band twice.

    リングヘアバンドでボビンを二重巻にする。

    Put a pipe cleaner into the hole of the thread and the bobbin and twist it twice on the top.

    That's it! Put them in a box. It's easy to find the needed color and no need to look for the matched bobbin.

    モールをミシン糸に差し込み、ボビンに通して上で2回ひねる。これでおしまい。

    並べて箱に入れておけば、すぐに必要な糸とボビンが探せます。モールが長ければハサミでカットしてくださいね。でも短すぎるとひねる時に扱いにくいです。


    作品を作りたいけど自宅にミシンがない、作り方がわからない方へ

    自宅でミシンカフェならぬ、ソーイング・カフェを開いています。お教えしますので、お友達と一緒に作りませんか?

    お問い合わせはプロファイル頁にあるアドレスにメールでお願いします。日程や時間帯はご相談に応じます。働いている方も是非手作りを楽しんで欲しいです。ミシンとロックミシンは揃っています。手作りを一緒に楽しみましょう。

    お問い合わせはこちらのプロファイル頁の左側、メール欄からどうぞ


    Thursday, June 14, 2012

    Super Easy Little Chandelier Tutorial: 簡単かわいいシャンデリアの作り方

    簡単かわいいシャンデリアの作り方です。
     
    シャンデリア作り方
    I always wanted a chandelier for my small space, something crystal shiny and not too big, and of course, not expensive. One day I went into a 300 yen (3-dollar) shop in Tokyo and found materials! It takes only 10 min.
    シャンデリアが欲しいな〜と思っていました。小さいスペースに向く安くてかわいいのがないなあ。300円ショップで閃いて、シャンデリアをハンドメイドで作ってみました。10分でできる超簡単なシャンデリアです。
    How to make an easy chandelier:
    Materials you need:
    • Plastic photo frames. 薄いプラスチック製の写真立て(2枚セットで300円)
    • A set of table cloth weights (4 weights) テーブルクロスおもり4個セット
    They are thin plastic photo frames. A package contained two.

    Cut the frames as above.

    薄いフレームをハサミで切ります。


    Put a table cloth wight to each strip.

    テーブルクロスおもりをそれぞれに付ける。

    Put them to the pendant light. The curly edge helps hold the piece without any additional materials like wire or glue. Voila!
    ペンダントライトに付けます。端がカールしているので引っ掛けるようにすると、結わえたりしなくて大丈夫。
    More embellishment you want? A fancy metal string (I bought at the same cheap shop) can be added as above.

    もっとかわいくしたいなら、メタルのシート(300円ショップ)を紐に絡めて。

    シャンデリア作り方
     

    Craft Blogs - BlogCatalog Blog Directory